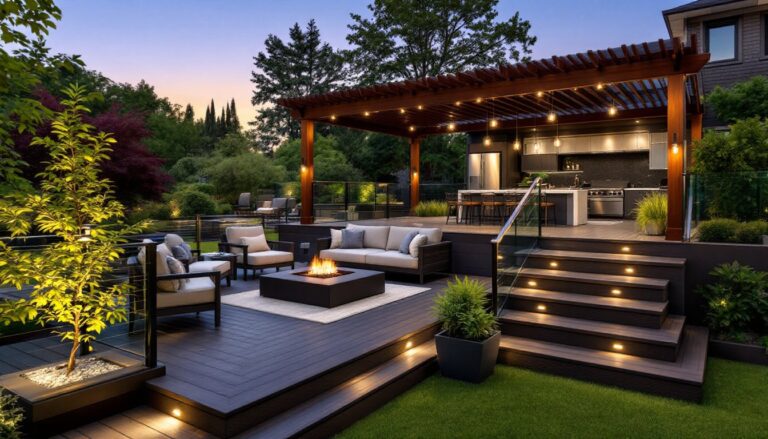
Building a luxury patio isn’t about slapping down pavers and calling it done. It’s about creating an outdoor room that feels intentional, high-end, and ready for both quiet mornings and full-scale entertaining. Whether the goal is a resort-style escape or a sleek modern lounge, the difference between “nice” and “luxurious” comes down to materials, planning, and the details most DIYers skip. This guide breaks down the elements that make a patio feel upscale, from the foundation materials to the finishing touches, so homeowners can tackle these projects with confidence and precision.
Table of Contents
ToggleKey Takeaways
- Luxury patio ideas require intentional design with defined zones, cohesive color palettes (limiting to three core tones), and careful site planning that considers sun angles and interior connections.
- Premium natural stone materials like bluestone and travertine ($15–$30 per square foot) or large-format porcelain pavers provide the refined durability that elevates luxury outdoor spaces beyond standard concrete.
- Strategic furniture placement with conversation zones, proper clearances (36–48 inches for walkways), and quality outdoor fabrics like Sunbrella create functional, resort-style seating arrangements.
- Layered lighting combining overhead fixtures, string lights, path lighting, and smart controls transforms a luxury patio into an evening destination and extends usability year-round.
- An outdoor kitchen positioned with the work triangle layout, marine-grade materials, and proper utilities (freeze-proof water lines and GFCI outlets) serves as an entertaining hub.
- Sophisticated landscaping, water features, and fire elements—from evergreen hedges to disappearing fountains and gas fire pits—add sensory appeal and year-round interest to your patio design.
Design Elements That Define Luxury Outdoor Living
Luxury outdoor spaces share a few core traits: they look cohesive, they use high-quality materials, and they feel like extensions of the interior. The foundation starts with intentional design choices that carry through every layer of the project.
First, consider the overall layout. A luxury patio doesn’t sprawl aimlessly, it has defined zones (dining, lounging, cooking) connected by sight lines and materials. Sketch a scaled plan on graph paper before ordering anything. Account for sun angles, prevailing wind, and how the space connects to the house. If the patio sits off a living room, match flooring tones or architectural details to blur the line between inside and out.
Color palettes matter. Stick to three core tones (think warm grays, charcoal, and cream, or earth tones with bronze accents). Overdoing it makes the space feel busy and cheapens the effect.
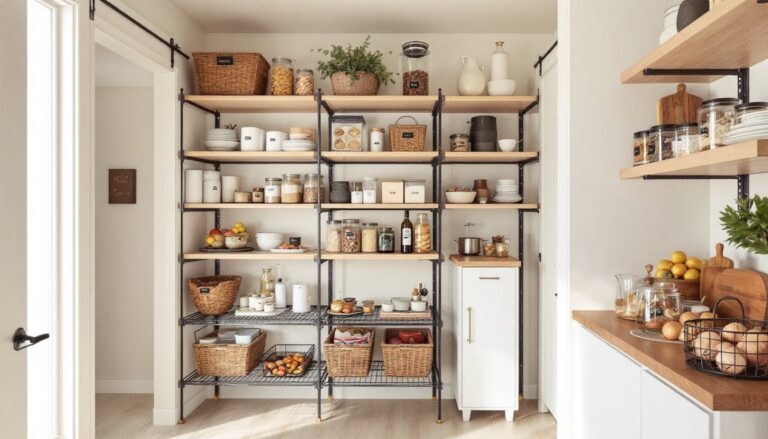
Premium Materials and Finishes
Natural stone is the gold standard for luxury patio surfaces. Bluestone, travertine, and limestone offer durability and a refined look that stamped concrete can’t replicate. Expect to pay $15–$30 per square foot installed, depending on region and stone type. Travertine stays cooler underfoot in hot climates, a real advantage around pools. Bluestone handles freeze-thaw cycles better in northern zones.
For a more budget-conscious approach without sacrificing appearance, large-format porcelain pavers (24″ × 24″ or larger) mimic natural stone and resist staining better than the real thing. They’re also lighter, which simplifies installation on elevated decks or rooftop patios.
Ipe and cumaru are premium hardwood decking options that age to a silver-gray patina or can be maintained with oil to keep their rich brown tones. Both are dense, rot-resistant, and last 25+ years with minimal upkeep. Installation requires pre-drilling and hidden fasteners, plan on twice the labor time compared to pressure-treated lumber.
Edging and borders add polish. Steel or aluminum edge restraints keep pavers crisp and prevent creep over time. For a softer look, low boxwood hedges or bluestone coping define the perimeter without hard lines.
Creating Intimate Zones With Strategic Furniture Placement
High-end patios don’t arrange furniture in a single row facing outward. They create conversation pockets, reading nooks, and separate dining areas that encourage people to move through the space.
Start with a sectional or L-shaped seating arrangement anchored by an outdoor rug (polypropylene or solution-dyed acrylic for weather resistance). Position seating to face a focal point, a fire feature, a view, or a water element. Leave at least 36 inches of clearance for walkways between zones: 48 inches is better for high-traffic paths.
For dining areas, allocate 10 feet by 10 feet minimum for a table that seats six, plus chair clearance. Round tables work well in tighter corners and feel more social. Pair them with cushioned dining chairs, not cheap resin. Look for powder-coated aluminum frames (rust-proof) with Sunbrella or similar solution-dyed fabrics that resist fading.
Day beds, hanging chairs, or a porch swing add a resort feel. Mount swings and hanging chairs into structural beams or use a freestanding frame rated for the load, don’t trust a decorative pergola rafter to hold 400+ pounds.
Outdoor rugs and throw pillows tie zones together visually. Store fabric cushions in a deck box during off-season to prevent mildew. Luxury doesn’t mean leaving $200 pillows out in November.
Statement Lighting to Elevate Your Patio Ambiance
Lighting turns a patio from a daytime-only space into an evening destination. Layered lighting, ambient, task, and accent, creates depth and drama.
Overhead fixtures like chandeliers or pendant lights work under covered patios or pergolas. Choose wet-rated or damp-rated fixtures depending on exposure (wet-rated for open-air installations). Run electrical in conduit if adding new circuits, and pull permits, outdoor wiring falls under NEC Article 110 and local codes. If running new lines isn’t feasible, hardwired solar pendants have improved, though battery life in winter remains a weak point.
String lights are a staple, but opt for commercial-grade LED strands with replaceable bulbs and a 12- or 14-gauge wire. Hang them on a slight catenary curve (not drum-tight) and anchor to posts or eye screws in fascia boards rated for the tension. Space strands 18–24 inches apart for even coverage.
Path and step lighting prevents trips and highlights landscaping. Low-voltage LED systems (12V) are DIY-friendly and energy-efficient. Bury wire 6 inches deep in conduit if crossing lawn areas. Uplighting trees or architectural features with narrow-beam spotlights adds a designer touch, aim for 3000K color temperature to keep it warm, not clinical.
Dimmers and smart controls let users adjust mood. Many outdoor living designs layer multiple light sources to create flexibility from bright task lighting to soft ambient glow.
Outdoor Kitchen and Dining Spaces for Entertaining
An outdoor kitchen elevates a patio from a seating area to a true entertaining hub. But building one right means planning for utilities, weatherproofing, and workflow.
Start with the work triangle: grill, sink, and prep surface should be within a few steps of each other. Allow 42–48 inches of clearance behind the cook for safety and movement. If the budget allows a built-in grill, look for 304 stainless steel (marine-grade) in coastal areas to resist corrosion. Freestanding grills work fine but look less integrated, consider a surround or enclosure clad in stacked stone or matching siding.
Countertops need to handle weather and heat. Granite and concrete are popular, but porcelain slabs are gaining ground, they’re non-porous, UV-stable, and available in large formats with minimal seams. Avoid tile with wide grout lines: they stain and crack.
Running a water line for a sink requires freeze-proof valving or a seasonal shut-off with drain-down capability. In cold climates, an above-ground line with quick-disconnect fittings is simpler than burying below frost line. Check local plumbing codes, some jurisdictions require a backflow preventer on outdoor water sources.
Storage and refrigeration keep clutter out of sight. Use marine-grade or powder-coated cabinetry, and add toe-kick vents to prevent moisture buildup. A built-in beverage fridge or wine cooler is a high-value upgrade: just make sure it’s rated for outdoor temps and has a GFCI-protected outlet.
Design elements inspired by upscale patio layouts often include features like brick pizza ovens, bar seating with footrests, and dedicated zones for serving and plating.
Landscaping and Greenery That Adds Sophisticated Charm
Plants soften hardscaping and create privacy without the bulk of fencing. The key is selecting species that suit the climate, require reasonable maintenance, and offer year-round interest.
Evergreen hedges like boxwood, privet, or Japanese yew provide structure and screening. Plant them 18–24 inches apart for a dense screen within two seasons. For faster coverage, consider clumping bamboo in large planters (running bamboo will invade everything if planted in-ground without rhizome barriers).
Ornamental grasses like feather reed grass or fountain grass add movement and texture with minimal care. They’re drought-tolerant once established and look sharp against modern or minimalist patio designs.
For vertical interest, install trellises or cable wire systems and train climbing plants like clematis, wisteria, or climbing hydrangea. Anchor supports into solid framing, not just siding, mature vines get heavy. Wisteria especially can pull down weak structures.
Container gardens offer flexibility and a polished look. Use large planters (at least 18″ diameter) to reduce watering frequency. Glazed ceramic, fiber-cement, or powder-coated steel hold up better than terracotta in freeze-thaw cycles. Group containers in odd numbers (3, 5, 7) and vary heights for visual balance.
Edible plants like dwarf citrus, herbs, or espaliered fruit trees blend function and beauty. A lemon tree in a Versailles planter is peak luxury-meets-practical.
Mulch beds with hardwood or shredded bark mulch (2–3 inches deep) to suppress weeds and retain moisture. Avoid dyed mulches near natural stone, they bleed color during rain.
Water Features and Fire Elements for Year-Round Appeal
Water and fire add sensory layers that turn a static patio into an experience. Both require planning around utilities, safety, and codes, but they’re worth the effort.
Water features range from simple bubbling urns to multi-tier fountains. For a DIY-friendly option, a disappearing fountain (water bubbles over a stone or basin and recirculates into a hidden reservoir) requires only a small pump, a GFCI outlet, and a catch basin buried below grade. Use a 100–200 GPH pump for a subtle flow: larger fountains need 400+ GPH. Line the reservoir with pond liner or use a pre-formed basin. Clean the pump intake monthly to prevent clogs.
Wall-mounted fountains or spillway features work well in compact spaces and many patio transformations integrate these as focal points. They need a water source and drainage or recirculation, running a hose bib nearby simplifies refilling.
Fire pits and fireplaces extend patio season into fall and winter. Wood-burning models create ambiance but require clearance from structures (usually 10 feet minimum, check local fire codes). Gas fire pits are cleaner and easier to control. Run a dedicated gas line (black iron or CSST flexible gas line) and have it pressure-tested and inspected. A licensed plumber or gas fitter is worth the cost here, DIY gas work is illegal in many areas and dangerous.
For fire tables, choose one with a rated BTU output between 40,000–60,000 for good heat without overwhelming a seating area. Pair with lava rock, fire glass, or ceramic logs for finished appearance.
Safety tips: Install fire pits on non-combustible surfaces like stone or concrete, never directly on wood decking without a rated fire pad. Keep a fire extinguisher nearby and never leave open flames unattended. If installing a built-in fireplace, ensure the flue meets IRC clearances and draft requirements.