A multi level deck isn’t just a backyard add-on, it’s a smart architectural response to terrain, function, and flow. Whether working with a sloped lot or carving out distinct zones on flat ground, multi level designs offer more usable square footage, better sight lines, and natural transitions between indoor and outdoor spaces. They handle elevation changes without massive retaining walls, create visual interest without fussy landscaping, and organize activities better than a single flat platform ever could. The trade-off? More complex framing, additional footings, and the need to think harder about code compliance and structural load paths. But for homeowners willing to plan carefully, a multi level deck delivers lasting value and function.
Table of Contents
ToggleKey Takeaways
- Multi level deck ideas solve sloped yard challenges by stepping with natural terrain, reducing costly grading and retaining walls while creating distinct functional zones for cooking, dining, and lounging.
- Proper planning is essential—each level requires independent footing systems, correct ledger attachment with flashing, and compliance with local IRC deck codes for guardrails, stair dimensions, and structural load requirements.
- Tiered decks on slopes work best with 12–18 inch elevation changes and consistent stair dimensions (7-inch rise, 11-inch tread), while wraparound designs on flat lots maximize usable space and require careful rim joist coordination.
- Material selection impacts long-term value: pressure-treated lumber is budget-friendly, composite eliminates maintenance but costs double, and railings should use galvanized or stainless hardware to prevent corrosion.
- Expect $25–$70 per square foot for material costs depending on decking type, with multi level designs adding 10–20% more due to extra footings and stairs—hiring professionals for ledger installation and steep-slope footings prevents catastrophic failures.
- Start with a detailed site survey, scaled framing plan, and early code review to ensure permit compliance and inspector approval at footing, framing, and final stages.
Why Choose a Multi Level Deck Design?
Multi level decks solve real problems. On sloped yards, they reduce or eliminate the need for expensive grading and retaining walls by stepping with the natural contour. Each level follows the grade, reducing the height of individual ledger connections and minimizing the amount of exposed framing below.
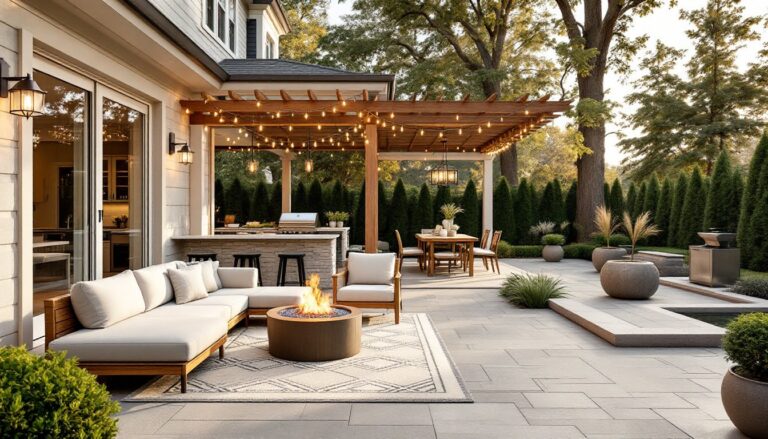
They also create functional zones without walls or railings interrupting the space. A cooking area on one level, dining on another, and a lounge zone on a third, each defined by elevation rather than furniture arrangement. This separation feels natural and helps manage traffic flow during gatherings.
From a structural standpoint, multi level decks distribute loads across more footings and often require shorter spans, which can actually simplify framing in some cases. They also offer opportunities to integrate stairs as architectural features rather than afterthoughts tacked onto one side.
But they do demand more planning. Each level needs proper ledger attachment (if connected to the house), independent or linked footing systems, and careful attention to IRC deck code for guardrails, stair rise/run ratios, and load-bearing requirements. Many jurisdictions require permits for decks over 30 inches above grade or attached to a dwelling, and multi level builds almost always trigger that threshold.
Best Multi Level Deck Layouts for Different Yards
Tiered Decks for Sloped Backyards
Sloped terrain is where multi level decks shine. A tiered layout follows the hillside in discrete platforms, connected by broad stair runs or landings. Each tier can be 12 to 18 inches different in height, enough to define space without requiring full-height railings between levels in some code jurisdictions (check local rules).
Framing follows the slope. Lower tiers rest on 6×6 posts set in concrete footings dug to frost line, with beams spanning between posts and joists running perpendicular. The upper tier typically ties into the house ledger with ½-inch lag screws or structural bolts, spaced per code (usually 16 inches on center in most regions). Flashing above the ledger is non-negotiable, use galvanized or rubberized membrane to prevent moisture intrusion behind siding.
For anyone referencing proven deck framing methods, advanced construction techniques provide detailed cross-sections and load calculations that go beyond basic deck guides.
Stairs between tiers should follow a consistent 7-inch rise and 11-inch tread dimension (or as close as the elevation change allows). Building inspectors scrutinize stair uniformity, so measure total rise carefully and divide evenly before cutting stringers.
Wraparound Multi Level Decks
On flatter lots or homes with multiple exits, a wraparound multi level deck defines separate outdoor rooms. One level might extend from the kitchen door for grilling and prep, stepping down to a lower lounge area accessible from a walkout basement or grade-level patio door.
Framing wraparounds requires coordinating rim joists at corners and ensuring post placement doesn’t create odd joist cantilevers. Most codes limit cantilevers to one-quarter of the joist span, so a joist spanning 10 feet can overhang 30 inches maximum.
Wraparounds also create inside corners where water can pool. Install joist flashing tape on all rim and ledger boards, and pitch decking slightly (about ⅛ inch per foot) away from the house to encourage drainage.
Design Features That Elevate Multi Level Decks
Built-in seating along the perimeter of one level saves floor space and creates clean sight lines. Frame seat boxes with 2×6 caps over a 2×4 frame, mounted to rim joists or blocking. Add hinged lids for hidden storage underneath, ideal for cushions, grill tools, or kids’ toys.
Integrated planters on upper levels add greenery without cluttering the deck surface. Build them as self-contained boxes with waterproof liners (EPDM or heavy plastic) and drill drainage holes in the decking below. Keep soil away from structural wood by lining boxes with landscape fabric.
Lighting transforms usability after dark. Low-voltage LED strip lights tucked under stair noses or along riser faces highlight elevation changes safely. Post cap lights mark corners and railings. For a cleaner install, plan wire runs during framing and drill access holes through posts before setting them.
Railing design can unify multiple levels or differentiate them. Cable rail systems offer unobstructed views and work well on upper tiers. Traditional balusters spaced no more than 4 inches apart (per IRC) suit lower levels near grade. Mixing materials, metal cable up top, wood pickets below, adds visual interest without chaos.
For homeowners interested in building custom railings or furniture to complement the deck, woodworking project tutorials offer plans and cut lists that integrate with standard deck framing dimensions.
Materials and Finishes for Multi Level Decks
Pressure-treated lumber remains the most budget-friendly option for framing and decking. Use ground-contact rated (0.60 PCF) for posts and any framing within 6 inches of soil. Standard above-ground treated lumber (0.40 PCF) works for joists, beams, and decking. Let treated wood dry for several weeks before applying stain or sealer, moisture content should drop below 15% for good penetration.
Composite decking eliminates annual maintenance and resists fading, but costs roughly double pressure-treated pine. It installs with hidden fasteners that clip into grooved board edges, creating a smooth surface without visible screws. Composite expands and contracts more than wood, so follow manufacturer specs for end-gap spacing (usually ⅛ to ¼ inch depending on temperature at install).
Cedar and redwood offer natural rot resistance and beautiful grain but require regular sealing to prevent graying. Expect to reapply penetrating oil or semi-transparent stain every 18 to 24 months in full sun.
For framing hardware, use hot-dipped galvanized or stainless steel joist hangers, angle brackets, and lag screws. Electro-plated hardware corrodes quickly in contact with treated lumber. Simpson Strong-Tie and USP offer code-approved connector systems with load ratings printed on each piece, use them and keep installation instructions for the inspector.
Railing materials should match or complement decking. Composite railing systems include post sleeves that slide over 4×4 treated posts, hiding the framing. Aluminum railing is lightweight, powder-coated for durability, and available in dozens of colors. Wood railings cost less upfront but need the same maintenance schedule as wood decking.
Planning Your Multi Level Deck Project
Start with a site survey. Mark slope direction, existing grade at the house, and locations of doors or windows that will access the deck. Measure from corners of the house to establish square layout lines, use the 3-4-5 triangle method to confirm right angles.
Draw a scaled plan showing each level’s footprint, footing locations, and framing direction. Include stair locations and note elevation changes between tiers. This drawing will be required for most permit applications.
Check local codes early. Most municipalities require permits for decks over 200 square feet or more than 30 inches above grade. Expect inspections at footing, framing, and final stages. Inspectors verify footing depth (below frost line, which varies from 12 inches in warm climates to 48 inches in northern zones), ledger attachment, joist spacing, and railing height (36 inches minimum for residential decks, 42 inches in some jurisdictions).
Foundation work comes first. Dig footings to code depth, set sono-tubes or footing forms, and pour concrete with embedded post anchors. Allow concrete to cure at least 7 days before framing.
Frame the highest level first if it attaches to the house. Install the ledger with proper flashing, then set posts and beams for that tier. Build outward and downward, linking each level with stairs or connecting framing members.
Budget time for material acclimation. Composite decking should sit on-site for 48 hours before install to adjust to local temperature and humidity. Treated lumber benefits from drying time to reduce cupping and twisting.
For builders interested in refining their deck framing skills before tackling a multi level project, free DIY furniture plans offer smaller-scale framing practice with similar joinery and measurement principles.
Most homeowners with solid carpentry skills can frame and deck a multi level structure, but consider hiring a licensed contractor for ledger installation, footing layout on steep slopes, or any structural tie-ins to the house. A poorly attached ledger is the leading cause of catastrophic deck failures. If the project involves more than basic post-and-beam work, cantilevered sections, complex angles, or integration with existing rooflines, get professional help.
Material costs vary widely by region and market conditions, but as a rough estimate, expect $25 to $40 per square foot for a pressure-treated deck with basic railings, and $45 to $70 per square foot for composite decking with upgraded railing systems. Multi level designs add 10% to 20% to material costs due to additional footings, hardware, and stair components. Labor (if hiring out) typically doubles the material cost.