Kitchen cabinets filled with toppling stacks of mismatched containers and mystery appliances don’t just waste space, they waste time every single day. The average home cook spends nearly 10 minutes per meal just searching for ingredients and tools, turning what should be a quick dinner prep into a scavenger hunt. Organizing kitchen cabinets isn’t about aesthetics or trendy bin systems: it’s about creating a functional workspace that actually works with how someone cooks. This guide walks through the proven process professionals use to transform chaotic cabinets into efficient storage zones, from the initial purge through long-term maintenance strategies.
Table of Contents
ToggleKey Takeaways
- Organizing kitchen cabinets starts with completely emptying and decluttering, removing at least 30% of unnecessary items that waste space and daily cooking time.
- Strategic use of shelf risers, tension rods, pull-out shelves, and vertical storage solutions can double usable cabinet space in standard kitchen layouts.
- Grouping items by category and frequency of use—placing daily essentials at eye level and seasonal items higher or lower—creates an efficient workflow that reduces meal prep time.
- Zone-based organization that aligns storage with cooking tasks (breakfast zone, prep zone, cooking zone, baking zone) eliminates unnecessary steps and improves kitchen functionality.
- Long-term maintenance through labeling, quarterly audits, immediate reshelving habits, and a one-in-one-out rule prevents cabinets from reverting to chaos within months.
Declutter Before You Organize
Empty everything out. Every single item. This isn’t optional, attempting to organize around existing clutter just creates neater-looking chaos.
Pull everything from the cabinets and spread it across the counter, table, or even the floor if needed. This forces a confrontation with duplicate items, expired goods, and tools that haven’t been used since 2019. Most kitchens harbor at least 30% unnecessary items taking up prime real estate.
Sort into four piles:
• Keep: Items used regularly or seasonally that are in good condition
• Donate: Duplicate tools, specialty gadgets used once, mismatched containers
• Trash: Anything broken, chipped, stained beyond saving, or expired
• Relocate: Items that belong elsewhere (cleaning supplies, pet food, office supplies)
Be ruthless with the “just in case” items. That fondue set gathering dust for six years? It’s not coming back into style for casual Tuesday dinners. The three garlic presses? Pick the best one.
Clean the empty cabinets thoroughly while everything’s out. Wipe down shelves, vacuum corners, and check for any signs of moisture or pest activity that need addressing before restocking.
Group Items by Category and Usage Frequency
With only keeper items remaining, sort them into logical categories before they go back into cabinets. This step determines where everything will eventually live.
Primary categories for most kitchens:
• Everyday dishes: Plates, bowls, and glasses used daily
• Cooking tools: Spatulas, whisks, measuring cups, mixing bowls
• Pots and pans: Cookware and lids
• Bakeware: Sheet pans, cake pans, muffin tins
• Food storage: Containers with matching lids (immediately discard orphaned pieces)
• Dry goods: Grains, pasta, canned goods, baking supplies
• Specialty appliances: Stand mixer, food processor, slow cooker
• Servingware: Platters, serving bowls, entertaining pieces
Within each category, separate items by usage frequency. Daily-use items get prime real estate at eye level or in the easiest-to-reach spots. Seasonal or occasional items go higher, lower, or toward the back.
The turkey roaster doesn’t deserve front-and-center placement in a cabinet when coffee mugs get used ten times a day. Testing various kitchen cabinet organizers helps refine these groupings before committing to a permanent system.
Maximize Vertical Space with Smart Storage Solutions
Standard kitchen cabinets typically measure 30-36 inches tall for upper cabinets and 34.5 inches for base cabinets (before countertop). Most people use only the bottom third of that space efficiently, leaving a massive volume untapped.
Shelf risers double the usable surface area instantly. These simple platforms (typically 4-6 inches tall) create two tiers where there was one. Place dinner plates on the bottom level and salad plates or bowls on the riser. Cost runs $10-25 for a set, depending on material and size.
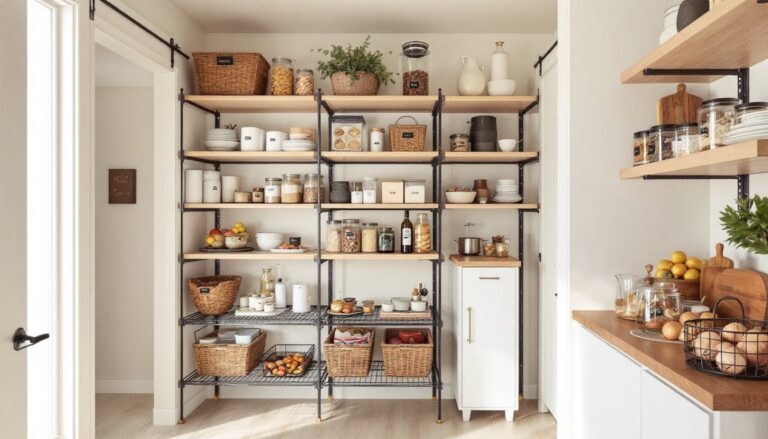
Stackable shelves work similarly but offer more flexibility. Wire or plastic shelving units allow customization of height and configuration. They’re particularly effective for canned goods, spices, or pantry staples.
Tension rods installed vertically create dividers for baking sheets, cutting boards, and serving platters. These items store much better on edge than stacked flat. Position rods 1-2 inches apart, adjusted to the item thickness. A three-pack costs around $12-18.
Under-shelf baskets hang from existing shelves to capture otherwise wasted air space. Slide them onto the shelf edge to create storage for lightweight items like sandwich bags, kitchen towels, or snack packages.
Door-mounted racks capitalize on the inside of cabinet doors. Spice racks, measuring cup holders, or cleaning supply caddies attach with screws or adhesive strips. Verify door clearance before installing, racks typically add 2-4 inches of depth.
Many professionals recommend organizing kitchen solutions that work with standard cabinet dimensions rather than requiring custom modifications.
Organize Lower Cabinets for Easy Access
Lower cabinets present unique challenges. They’re deeper (typically 24 inches), harder to see into, and require bending or kneeling. Poor organization here means items get shoved to the back and forgotten.
Pull-out shelves solve the visibility and access problem completely. These sliding platforms (also called roll-out trays) bring contents to you rather than forcing awkward reaching. Installation requires basic tools: measure the cabinet opening width and depth, mount the slides to the cabinet sides with screws, then attach the shelf. Expect $30-80 per shelf depending on weight capacity and quality. These are worth every penny for heavy pots, appliances, or pantry items.
Lazy Susans maximize corner cabinet space, which otherwise becomes a black hole for lost Tupperware lids. The rotating platform keeps everything accessible. Choose two-tiered versions for greater capacity. Diameter should be 2-3 inches smaller than the cabinet depth to allow smooth rotation.
Drawer organizers tame utensil drawers and prevent the jumbled mess that develops over time. Adjustable dividers create custom compartments sized for specific tools. Bamboo or plastic inserts run $15-40 depending on size and quality.
Deep bins or baskets corral categories in large base cabinets. Label each bin and pull the entire container out when needed. This works well for lunch-packing supplies, baking ingredients, or kids’ dishes.
Store heaviest items in lower cabinets, cast iron cookware, small appliances, bulk ingredients. This follows basic safety logic and makes lifting more ergonomic. The stand mixer doesn’t belong on a shelf above shoulder height.
Create Zones Based on Your Kitchen Workflow
Zone planning mirrors the natural flow of cooking tasks. Storing items near where they’re actually used eliminates unnecessary steps and improves efficiency.
Coffee and breakfast zone: Group coffee maker, mugs, filters, coffee, and sweeteners in one area, ideally near the water source. Add cereal, bowls, and breakfast essentials if space allows.
Prep zone: Station cutting boards, knives, mixing bowls, and measuring tools near the primary work surface. Include frequently used spices and oils within arm’s reach. Many expert organizing strategies emphasize this prep-zone concept as fundamental.
Cooking zone: Store pots, pans, cooking utensils, pot holders, and everyday oils and seasonings adjacent to the range. Lids deserve their own organizer rack rather than getting tossed randomly with pans.
Baking zone: Consolidate flour, sugar, baking powder, measuring cups, mixing bowls, and baking pans in one location. Store vertically when possible to maximize space.
Cleaning zone: Keep dish soap, sponges, trash bags, and dishwasher pods under or near the sink. Store dish towels and cleaning supplies in this zone as well.
Serving and storage zone: Position food storage containers, plastic wrap, foil, and lunch-packing supplies together. This area gets heavy use during meal cleanup.
Not every kitchen has space for perfect zones, especially in smaller layouts. Prioritize the zones matching actual cooking habits. Someone who bakes weekly needs a dedicated baking station: someone who doesn’t can skip it entirely.
Maintain Your Organized Cabinets Long-Term
Organization isn’t a one-time project, it’s an ongoing practice. Without maintenance systems, cabinets revert to chaos within months.
Return items to their designated spots immediately. This is the single most important habit. When everyone in the household knows where things belong, maintaining order becomes automatic rather than effortful.
Run a quarterly audit. Every 3-4 months, quickly review cabinet contents. Remove expired items, reassess whether storage solutions are working, and adjust as needed. Cooking habits change seasonally, so summer grilling tools might shift forward while winter baking supplies move back.
Label everything. Labels aren’t just for Pinterest-perfect aesthetics, they prevent the slow drift of items migrating to wrong spots. Use a label maker, masking tape and marker, or even dry-erase labels for bins and shelf zones. When categories are clearly marked, other household members can maintain the system without constant instruction.
Carry out a one-in, one-out rule. When a new serving bowl or gadget enters the kitchen, something else should leave. This prevents the gradual accumulation that leads back to clutter.
Address problems immediately. If something consistently doesn’t get put away or an organizer isn’t working, fix it. Don’t fight the system, adjust the system. Maybe the spot isn’t convenient, or the container is too small.
Keep a small donation box under the sink. When someone realizes they never use that muffin tin or duplicate whisk, it goes straight into the box. When full, donate it. Those interested in expanding beyond kitchen organization find that effective storage cabinet solutions apply throughout the home.
Conclusion
Organized kitchen cabinets transform daily cooking from frustrating to functional. The process requires an upfront time investment, plan on 4-8 hours for a complete kitchen depending on size and clutter level, but the return is immediate. Spending less time searching and more time actually cooking makes meal prep faster and more enjoyable. Start with the decluttering phase and work through zones methodically rather than trying to tackle everything at once.