A cluttered pantry doesn’t just waste space, it wastes time and money. When cans hide behind cereal boxes and spice jars vanish into back corners, meal prep becomes a scavenger hunt. The right shelving setup changes that completely. Whether working with a walk-in pantry, a reach-in closet, or a few linear feet between studs, strategic shelving decisions make every square inch count. This guide covers practical solutions, from adjustable systems and pull-out mechanisms to open-versus-closed configurations and weekend-friendly DIY builds, that help homeowners maximize storage, improve access, and keep inventory visible.
Table of Contents
ToggleKey Takeaways
- Strategic pantry shelves ideas transform cluttered storage into functional systems that reduce food waste and save time during meal preparation.
- Adjustable shelving systems with vertical standards mounted to wall studs offer flexibility to adapt storage as needs change, while proper depth and spacing eliminate dead air and buried inventory.
- Pull-out shelf solutions with full-extension drawer slides bring hard-to-reach items forward without rearranging, making deep pantries significantly more accessible and usable.
- Open shelving encourages inventory visibility and organization, while cabinet-style pantries protect contents from dust and light; hybrid approaches combine both for optimal balance.
- Proper anchoring into wall studs, matching shelf depth to pantry dimensions, and organizing by use frequency (daily items at eye level, bulk goods on lower shelves) maximize functionality and safety.
- DIY projects like pipe-and-wood industrial shelves, floating brackets, and crate cubbies offer cost-effective alternatives to commercial systems while maintaining durability with correct materials and installation.
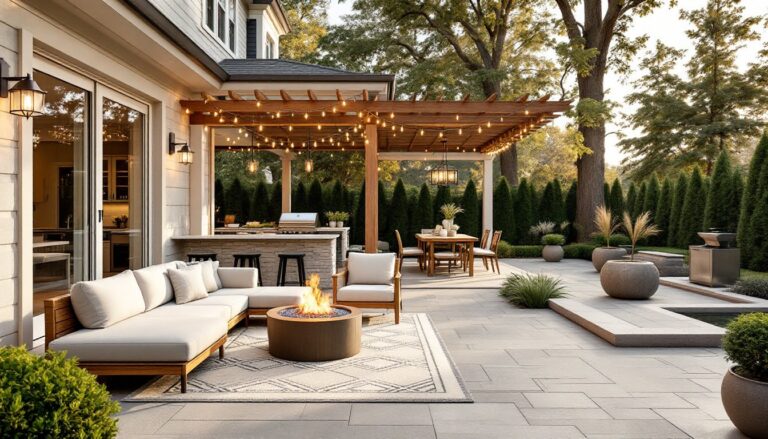
Why Smart Pantry Shelving Makes All the Difference
Standard builder-grade pantries typically feature fixed shelves spaced 12–16 inches apart. That works fine for cereal boxes but creates dead air above shorter items like canned goods or jars. Poorly planned shelving forces homeowners to stack items two or three deep, burying half their inventory.
Depth matters as much as spacing. Shelves deeper than 16 inches create blind zones unless paired with pull-out mechanisms or lazy Susans. Shelves shallower than 10 inches limit what fits but keep everything visible, a trade-off worth considering for narrow spaces.
Load capacity isn’t optional. Adjustable shelf standards and brackets rated for 50–75 pounds per linear foot handle most pantry staples. Heavier loads, bulk flour bags, gallon jugs, small appliances, require either ¾-inch plywood shelving or solid wood at least ⅝ inch thick, properly supported every 32 inches. Sagging shelves don’t just look bad: they create safety hazards and limit functionality.
Proper shelving also reduces food waste. When inventory stays visible and accessible, fewer items expire unnoticed. A well-planned system pays for itself in time saved and groceries preserved.
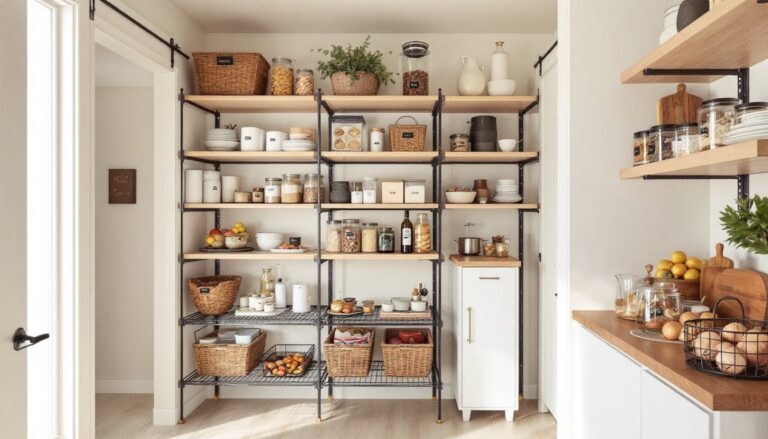
Adjustable Shelving Systems for Ultimate Flexibility
Adjustable systems use vertical standards (metal or aluminum tracks) mounted to wall studs, with brackets or clips that reposition easily. This setup adapts as storage needs change, raise shelves for bulk items, lower them for kids’ snack access, or reconfigure entirely when switching from canned goods to small appliances.
Installation requires finding studs. Standards must anchor into 16-inch or 24-inch on-center framing with appropriate fasteners, typically #8 or #10 screws, at least 2 inches long, driven into solid wood. Drywall anchors alone won’t support loaded shelves. If studs don’t align where shelving is needed, install a horizontal backer board (1×4 or 1×6 solid pine) across multiple studs first, then mount standards to the backer.
Material choices affect longevity. Wire shelving systems from big-box stores install quickly and cost less upfront, but sag under heavy loads and create small-item instability (spice jars tip through gaps). Solid shelving, melamine-coated particleboard, plywood with edge banding, or prefinished wood, provides better support and a cleaner look. For small kitchen solutions, adjustable systems maximize every inch without permanent commitment.
Shelf depth should match pantry depth minus 2 inches for clearance. In a 24-inch-deep closet pantry, 22-inch shelves prevent items from pushing against the door. Shallower 12-inch shelves work well on sidewalls where visibility trumps capacity.
Pull-Out and Sliding Shelf Solutions
Pull-out shelves (also called rollouts or glide-outs) bring back-row items forward without rearranging everything in front. They’re especially useful in deep pantries or base cabinets repurposed for food storage. Full-extension drawer slides rated for 75–100 pounds make the difference between a wobbly annoyance and a dependable workhorse.
Undermount slides attach to the shelf bottom and cabinet sides, hiding hardware for a cleaner look. Side-mount slides (epoxy-coated or ball-bearing) install along shelf edges and are easier for DIYers to fit and align. Soft-close mechanisms add cost but prevent slamming and extend slide life.
Measure carefully before ordering. Pullout shelves need ½ inch clearance per side for slides, so a 16-inch cabinet interior accommodates a 15-inch-wide shelf maximum. Depth should allow the shelf to extend fully without hitting the door when open. Most manufacturers offer prebuilt rollout kits sized for standard cabinet widths (12, 15, 18, 21 inches), simplifying installation.
For pantries without existing cabinet boxes, building a simple plywood box frame with dividers creates individual bays for pullouts. Use ¾-inch plywood for sides and ½-inch for backs: dado joints (¼-inch-deep grooves) strengthen corners better than butt joints secured only with screws.
Retrofit kits let homeowners add pullouts to existing fixed-shelf pantries without major demolition. Many use clips or undermount brackets that don’t require precise drilling, a plus for renters or those avoiding permanent modifications.
Open Shelving vs. Cabinet-Style Pantry Designs
Open shelving exposes everything at a glance, encouraging tidiness and making inventory tracking effortless. It works beautifully in dedicated pantry rooms or walk-in closets where aesthetics matter less than function. Downsides include dust accumulation and visual clutter if items aren’t kept uniform or contained.
Open shelves require consistent depth and spacing to avoid a chaotic look. Matching bins, baskets, or clear containers create visual cohesion. For a polished finish, add a 1×2 or 1×3 edge trim (poplar or pine) to the front of plywood or melamine shelves, then paint or stain to match cabinetry.
Cabinet-style pantries with doors hide mess and protect contents from dust, grease, and light exposure (important for certain oils and spices). Standard cabinet doors add cost and complexity, hinges, handles, alignment, but rolling barn-style doors or simple curtains offer middle-ground solutions.
In small spaces, apartment decor tips often favor open shelving to avoid the visual weight of closed cabinets. The key is intentional curation: open shelves work when contents stay organized: closed cabinets forgive daily chaos.
Hybrid approaches combine both. Upper shelves stay open for frequently accessed items (cereal, snacks, coffee), while lower cabinets with doors conceal bulk goods, cleaning supplies, or less photogenic packaging. This balances accessibility with a cleaner visual footprint.
Lighting transforms open pantries. Battery-operated LED strips or plug-in puck lights under each shelf eliminate shadows and make labels readable. Hardwired options require basic electrical work, running 12/2 Romex to a switch and junction box, but provide permanent, code-compliant lighting. Check local codes: some jurisdictions require GFCI protection in pantries located near kitchens.
Creative DIY Pantry Shelf Projects You Can Build
Pipe-and-Wood Industrial Shelves combine ¾-inch black iron pipe fittings (flanges, tees, elbows) with dimensional lumber or butcher block. The pipe acts as both structure and design element. Flanges mount directly to studs: horizontal pipes support shelves. Use 1×12 pine boards (actual dimensions: ¾” × 11¼”) for lighter loads or 2×12 construction-grade lumber (1½” × 11¼”) for heavier storage. Sand, stain, and seal wood with polyurethane before assembly. This project requires a pipe cutter or hacksaw, adjustable wrenches, and a drill.
Bracket-and-Board Floating Shelves use heavy-duty steel brackets (L-brackets or decorative cast-iron) anchored into studs. Pair with ¾-inch plywood ripped to width or prefinished melamine boards from home centers. Space brackets every 24–32 inches depending on load. For a cleaner look, recess brackets into dadoes routed into the shelf bottom, this hides most of the hardware while maintaining support.
Crate or Cubby Shelving repurposes wooden crates or builds simple box frames from 1×10 or 1×12 pine, stacked and secured. Each box becomes a cubby for baskets, bins, or bulk items. Fasten boxes together with 1¼-inch wood screws from the inside, then anchor the entire assembly to wall studs with L-brackets or French cleats for safety. This modular approach allows easy reconfiguration.
For detailed organization strategies, combining DIY shelving with intentional layout planning maximizes results.
Corner Shelves tackle awkward pantry geometry. Cut triangular shelves from plywood using a circular saw or jigsaw, then support with corner brackets or build a simple cleat system from 1×2 strips screwed into adjacent walls. Lazy Susans (turntable hardware available at home centers) turn corner shelves into active storage instead of dead zones.
Safety note: Always wear eye protection when cutting wood, and use a dust mask when sanding. Secure shelves to studs, not just drywall, to prevent collapse under load.
Organizing Your Pantry Shelves Like a Pro
Good shelving means little without a logical layout. Zone by use frequency: daily items (coffee, snacks, breakfast staples) at eye level: occasional-use items (specialty baking ingredients, holiday goods) on top shelves: heavy or bulk goods (canned tomatoes, flour bags) on lower, sturdier shelves.
Measure container heights before setting shelf spacing. Standard cans (14.5 oz) need 5–6 inches of clearance: cereal boxes often require 12–14 inches. Adjustable systems accommodate these variations: fixed shelves should plan for tallest common items per zone.
Clear containers (BPA-free plastic or glass) let users see inventory and stack uniformly. Decant bulk goods, rice, pasta, flour, sugar, into airtight containers to prevent spills and pest issues. Label everything with contents and purchase or expiration dates using a label maker or painter’s tape and permanent marker.
Risers and tiered organizers create stadium-style visibility for canned goods and jars. These simple platforms (often wire or acrylic) sit on existing shelves, doubling usable surface area without adding permanent infrastructure.
Door-mounted racks capture unused real estate. Over-the-door organizers or shallow shelves mounted to the door interior hold spices, foil, wraps, or small packets. Ensure door hinges and frames can handle added weight, standard residential hinges support about 50 pounds per pair: heavier loads need upgraded hinges or alternative mounting.
Basket and bin strategy: Assign categories to containers, snacks, baking, breakfast, canned goods, and pull the whole bin when needed. This works especially well on high or deep shelves where individual items get lost. Label bin fronts clearly.
Rotate stock using a first-in, first-out system. Place new purchases behind older items. This simple habit reduces waste and keeps pantry contents fresh.
Conclusion
Effective pantry shelving isn’t about trends, it’s about making daily routines smoother and maximizing usable space. Whether installing adjustable standards, adding pull-out trays, or building custom pipe shelves, the right system depends on pantry dimensions, household needs, and willingness to invest time or budget. Prioritize sturdy materials, proper anchoring, and logical layout. A weekend spent upgrading pantry shelves pays ongoing dividends in reduced clutter, less food waste, and faster meal prep.