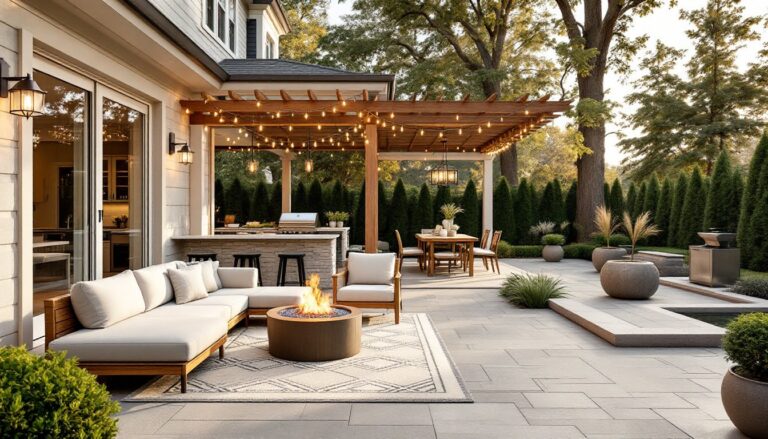
A patio that’s too small for a full dinner party, too cramped for lounge chairs, or too outdated for the way homeowners actually use their yard isn’t doing its job. Extending a patio isn’t just about adding square footage, it’s about creating functional zones for cooking, dining, and relaxing without breaking the budget or requiring a full-scale renovation. Whether the goal is a simple gravel addition or a multi-level deck with a pergola, the right approach depends on budget, yard layout, and how the space will be used. Here’s how to evaluate options and execute a patio extension that makes sense for real outdoor living.
Table of Contents
ToggleKey Takeaways
- A patio extension creates functional zones for cooking, dining, and relaxing, with gravel and pavers offering budget-friendly starting points at $3-$20 per square foot.
- Deck additions work best on sloped yards and offer flexible design integration, ranging from pressure-treated lumber ($15-$25/sq ft) to low-maintenance composite materials.
- Covered patio extensions and pergolas require building permits in most areas, especially when attached to the house, so verify local codes before starting construction.
- Multi-level patio designs work well on sloped lots and require careful attention to step heights (6-8 inches is comfortable) and drainage to prevent water pooling.
- Material selection should balance durability, climate conditions, and maintenance—air-entrained concrete for freeze-thaw climates, porcelain pavers for stain resistance, and pressure-treated lumber for cost savings.
- A well-executed patio extension should occupy 30-40% of the backyard to maximize value without overcrowding the yard and improve resale appeal for buyers evaluating usable outdoor space.
Why Extend Your Patio?
Most patios are built to minimum dimensions, just enough to fit a grill and a table. But outdoor living has evolved. Homeowners want dedicated zones for cooking, seating, fire pits, and even outdoor workspaces. A patio extension solves layout problems without the cost of starting from scratch.
An extension can also address drainage issues, especially if the original patio slopes incorrectly or puddles after rain. Adding a properly graded section improves water runoff and protects the home’s foundation. It’s also a chance to upgrade materials, swapping cracked concrete for pavers or adding a shade structure that makes the space usable year-round.
From a resale perspective, outdoor living space adds measurable value. Buyers pay attention to usable square footage, and a well-executed patio extension signals thoughtful maintenance and design. Just make sure the extension matches the home’s architecture and doesn’t overcrowd the yard. A patio that takes up 30-40% of the backyard is the sweet spot for most lots.
Before breaking ground, check local building codes. Most patio extensions under 200 square feet don’t require permits if they’re ground-level and not attached to the house, but rules vary by jurisdiction. Attached or elevated structures often trigger setback requirements, frost-line footings, or inspections. Call the building department early to avoid rework.
Budget-Friendly Patio Extension Options
Gravel and Pavers
Gravel remains one of the cheapest ways to extend a patio, typically running $3-$7 per square foot depending on gravel type and edging. Pea gravel is popular for its rounded texture and natural drainage, though it shifts underfoot and requires periodic top-dressing. Crushed granite compacts better and stays put, making it easier to walk on and set furniture on.
Prep work matters. Start by excavating 3-4 inches below the desired finished grade. Lay landscape fabric to block weeds, then add a 2-3 inch base layer of crushed stone (¾-inch minus) and compact it with a plate compactor, hand tamping won’t cut it for long-term stability. Install metal or plastic edging to contain the gravel, then top with 1-2 inches of your chosen gravel. Budget-conscious DIYers often combine pea gravel with reclaimed pavers for a mixed-material look that keeps costs low.
Paver extensions run $10-$20 per square foot for materials, with labor doubling that if hiring out. Concrete pavers are the budget pick, while natural stone and porcelain pavers cost more but handle freeze-thaw cycles better in cold climates. For a DIY-friendly install, stick with 12×12-inch or 16×16-inch pavers on a sand-set base, no mortar required. Excavate 6-7 inches, lay landscape fabric, add 4 inches of compacted crushed stone base, then 1 inch of leveling sand. Screed the sand flat, set pavers with a rubber mallet, and sweep polymeric sand into the joints to lock everything in place.
Skip the polymeric sand if the patio will be under a roof or pergola, it needs water activation to cure. Standard joint sand works fine for covered areas.
Deck Additions for Versatile Outdoor Living
A deck extension works best when the yard slopes, the soil is unstable, or the existing patio sits higher than grade. Decks also offer flexibility, built-in benches, planters, and railings integrate easily, and the framing can accommodate future add-ons like hot tubs or shade sails.
Pressure-treated lumber is the go-to for budget-conscious builds, running about $15-$25 per square foot for materials. Use PT for the framing (posts, beams, joists) and choose between PT decking, cedar, or composite for the surface. PT decking is cheapest but requires yearly staining. Cedar resists rot naturally and looks better but costs 30-40% more. Composite decking eliminates maintenance but runs $30-$45 per square foot installed, worth it for high-traffic areas or homeowners who won’t commit to yearly upkeep.
Framing must meet local codes. Most jurisdictions require deck joists spaced 16 inches on center for residential use, with beam sizing and post spacing determined by span tables in the IRC (International Residential Code). Decks over 30 inches high need guardrails at 36-42 inches, and any deck attached to the house requires a ledger board lagged into the rim joist with galvanized or stainless lag screws, not nails.
Footings are the foundation. In cold climates, posts must sit on concrete footings poured below the frost line (typically 36-48 inches deep). Use cardboard sonotube forms to shape the footings, and set galvanized post anchors in the wet concrete to keep wood off the ground. In warm climates, precast concrete deck blocks work for low, freestanding decks under 200 square feet, but they’re not code-compliant everywhere.
A circular saw and drill will get the job done, but a miter saw makes crosscuts cleaner, and a framing nailer speeds up joist installation. Rent a post-hole digger or auger if digging more than four footings, manual digging in clay or rocky soil is brutal.
Covered Patio Extensions and Pergolas
Adding a roof or pergola to a patio extension turns it into a three-season (or four-season, depending on climate) living area. Covered spaces protect furniture, reduce glare, and make the patio usable even in light rain. But they also trigger permit requirements in most areas, especially if attaching to the house or exceeding 120 square feet.
A gable or shed roof attached to the house functions like a room addition and requires engineered plans in most jurisdictions. Roof loads, ledger attachment, and flashing details all need to meet code. Hire a structural engineer if the existing roof framing wasn’t designed to support a patio cover, inadequate attachment can damage the home’s structure or cause leaks.
Freestanding pergolas are easier. Posts sit on concrete footings, beams span between posts, and rafters create partial shade. Standard spacing is 16 inches on center for rafters if planning to add shade fabric or a polycarbonate roof later: 24 inches works for open-air pergolas. Use 6×6 posts for structures over 12 feet wide, and through-bolt beams to posts with galvanized carriage bolts, lag screws alone won’t handle wind loads.
Western and southern outdoor design traditions often favor vine-covered pergolas for natural shade, which takes 2-3 growing seasons to fill in. Wisteria, grapevines, and climbing roses all work, but they add weight and moisture, use rot-resistant lumber like cedar or redwood, or upgrade to aluminum pergola kits if maintenance isn’t appealing.
Polycarbonate panels are a middle ground between full roofing and open rafters. They block UV and shed rain but let light through. Install them with a slight pitch (minimum 1/4 inch per foot) for drainage, and use foam closure strips at the panel edges to keep out bugs and debris. They expand and contract with temperature swings, so don’t overtighten the fasteners, use washer-head screws with neoprene washers and leave 1/8 inch of play.
Multi-Level Patio Designs
Multi-level patios work well on sloped lots or when creating visual separation between activity zones, an upper dining area and a lower fire pit lounge, for example. The elevation change eliminates the need for retaining walls in some cases and adds architectural interest.
The transition between levels needs careful planning. A 6-8 inch step is comfortable for most users and doesn’t require a railing if it’s a single step. Multiple steps trigger handrail requirements once the total rise exceeds 30 inches in most codes. Tread depth should be at least 11 inches for outdoor steps, and the rise should stay consistent, variations of more than 3/8 inch between steps are a trip hazard.
Materials can match or contrast. A stamped concrete upper patio with a flagstone lower level creates a defined transition. Pavers on both levels with a different laying pattern (herringbone vs. running bond) signals the change without a hard material shift. Just make sure the lower level drains away from the upper, use a 1-2% slope minimum to prevent water pooling at the step.
Retaining walls may be necessary if the grade change is steep. Walls under 3-4 feet can often be built with segmental retaining wall (SRW) blocks without engineering, but check local rules. Taller walls need geogrid reinforcement, drainage aggregate behind the wall, and sometimes a building permit. If the wall is load-bearing (supporting the patio surface or a structure), hire a pro, collapse isn’t worth the savings.
A porch-and-patio combination is a classic multi-level layout in traditional home design, with a covered upper porch at door level and an open lower patio at grade. This setup works especially well on homes with a raised foundation, eliminating the need for steep stairs.
Materials and Finishes to Consider
Concrete is the workhorse material for patio extensions. A basic broom-finish slab runs $6-$10 per square foot, while stamped or stained concrete adds $12-$18. Pour thickness should be 4 inches minimum for patios without vehicle traffic, over a compacted gravel base and 6-mil poly vapor barrier. Control joints every 8-10 feet prevent random cracking. In freeze-thaw climates, use air-entrained concrete mix (typically 5-7% air content) to resist spalling.
Flagstone offers an upscale, natural look and handles temperature swings well. Dry-laid flagstone (set in sand or stone dust) is DIY-friendly but shifts over time. Mortared flagstone over a concrete base is more stable but cracks if the slab moves. Expect to pay $15-$30 per square foot for materials, depending on stone type. Irregular flagstone requires patience to fit, plan on 30-50% longer install time than pavers.
Porcelain pavers are gaining ground in outdoor spaces. They resist stains, don’t absorb moisture, and can mimic wood or stone. They’re pricier ($20-$40 per square foot) and require a pedestal system or mortar bed for stability, but they won’t fade or crack like some natural stones.
Brick pavers are a traditional choice for extensions that need to match existing hardscaping. Use SW-grade (severe weathering) brick in cold climates, standard building brick will flake apart after a few freeze-thaw cycles. Lay brick in a herringbone or basket-weave pattern for better interlock and less shifting.
Finish surfaces matter. Smooth-troweled concrete is slippery when wet, stick with broom or brushed finishes. Sealed pavers resist stains but need resealing every 2-3 years. Skip sealers on gravel and flagstone unless moss or efflorescence is a problem.
Safety note: Wear gloves and safety glasses when cutting pavers or mixing concrete. A dust mask or respirator is required when cutting any masonry, silica dust is a serious lung hazard. Use a wet saw when possible to control dust.